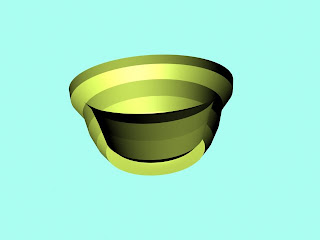
This week I created a bowl using more advanced modelling techniques in 3d Studio max. We learnt techniques using the line snapping tool and drawing shapes in 2d and then creating a pull out to convert them to 3d. The process was basically creating a 2d shape from the Create - and then Shapes menu (As opposed to geometry). Then pick an object to start with, say for instance text, and write the desired text in the text box, You then have some 2d text on the screen and rotate it so it's standing up. Then you need to right-click, Convert to editable Poly and create a drag out from the modifier menu. This will enable you to drag your text out and create it into your desired 3d shape. Here is a Bowl I created earlier using the Lathe function.
To Start with I used the line shape tool to draw out half of a bowl, but the only part i had to draw was a 2d view as if you were looking from side on but to create the 3d effect i will go through in a minute you have to draw the inside and outside of the bowl, so like a 3d subsection of half a bowl (if that makes sense - I will try and post a picture up of what i mean). Next we converted it to an editable poly and chose the modifier tab to 'lathe' the shape, this automatically created my shape that i had drawn into the full 3d object you see above, although, i have edited the colours of the bowl and the background to make them contrast to stand out a little better. The only other thing that was done to add the smoothing option available to me so it looked more like a finished piece as oppsoed to a piece of pottery that had been half produced.
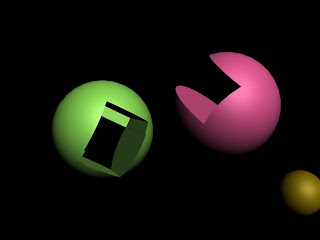
Here are a couple of spheres I have created using a pro-boolean.

Basically what I have to create this effect is to start off by creating two shapes. For example a sphere and a box, you would need to move the box and place it into part of the other object (in this instance - the sphere), select both objects and convert to editable polys.
Then you choose the Pro-boolean option to remove the selected shape and the space that it is taking up within the other object leaving you something similar to the picture
 on the left.
Here is some text i created and manipulated using the text tool on the 2d shapes bar. I worte the text, chose the size etc and then coverted to editable poly. Under the modify tab on the right under modifiers, I opened up the list menu and chose Polygon to edit the text, next i just selected each letter or a group of letters at random and started twisting and turning the text. The image to the right took me no longer than 3 minutes to complete so I found it an easy operation.
1 comment:
I really like your shapes
Alex. Good use of colours!
Post a Comment