Saturday 28 February 2009

Tutorial 3 - Bones

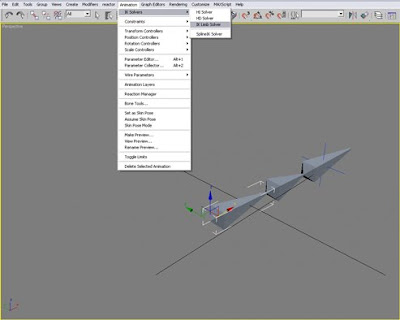
For this tutorial we were showed how to use bones in 3d Studio max, Bones can be found under the Create tab and then 'Systems', By clicking on the 'bones' button. it will allow you to create, surprisingly, a bone or some bones if youw ant to do more than one. Each time you click it will automatically create another bone until you either right-click or press Esc. having these bones could be used to form a still image, but at the moment havent got much use in an animation - which is no use to us right now. you need to join them so they are able to move in sync with each other. To do this, click on the first bone you created and then under the menu options at the top, click 'Animation' - 'IK Solvers' - 'IK Limb Solvers' this will select automatically the bone you have selected and ask you to create a link through the other bones shown by a line which you need to click and join at the end of the bone line.


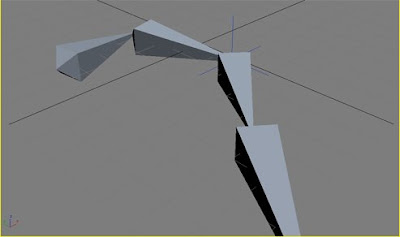
As you can see above, there is a line that is needed to join the bones, but once this link is created, you are then able to move the bones as you would is you were moving an arm or a leg, here is an image of the linked bones bending:


And that is a very simple tutorial for modelling bones.

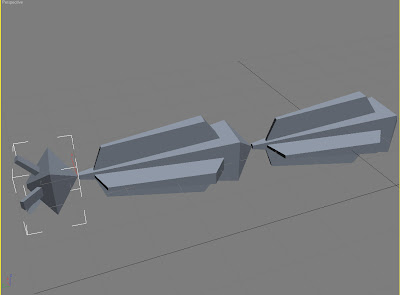
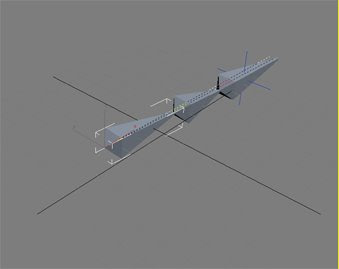
On the bones options before you create them, you have the option to add fins, these add to the chunkiness to the bone, which in turn can add more realism when you are trying to model a human or an animal. Demonstrated below are some bones with fins and also a screen shot of the bones and fins panel:


To be continued....

Thursday 12 February 2009

Tutorial 2 - Morphing

This lecture we learnt how to Morph objects. However, morphing is a skill we will probably not use too much, it is still handy to know if we ever have a need to create two objects that need to be morphed, a common scene would be for example a face changing. Use the morph feature uses lots of the systems memory which is why its good not to do too much morphing, especially if your computers resources aren't that high.

To morph we need to start off with a base object, we used a box with 1 width segement, 1 depth segment and 2 height segements (all objects that you are morphing into need to have the exact same amount of segements, which is why cloning from the original is always to best option for your second/third objects).

So if we clone from the original object two times after making the first object an editable poly, the shortcut for cloning is holding shift and dragging the item and it automatically creates another and another asking you to rename them each time, change the colours of the boxes and rename them appropriately (i.e. Blue box, green box etc)

Edit the vertices on the two cloned boxes but do them so the two clones boxes are different from each other, for example on one box pull the top vertices down and on the other pull the bottom vertices up.


Click on the original box you first created. select the 'Morpher' tool from the modifier list. Now it should come up with a list of about 100 or so buttons that say -empty-, click on the first one and click the button that says 'Pick object from scene' and then click on your first cloned object. The button should now come up with the text that you called the first cloned object. Follow this for the second cloned object and then cange the figures in the box next to the button. You should be able to see your original shape changing into more like one of the other two boxes, or both.

To animate this scene, first click, 'Autokey' and then use the keyframe slider at the bottom of the window and move it to frame 15 for example, then change the figures in the boxes next to your green box/blue box buttons, then keep moving thekeyframe slider to different points and changing the figures each time. You have now created the animation and if you press the play button it will play your animation on a repeat cycle for you to watch.

If you follow the steps I took in my first semester 2 tutorial, you will be able to extract this as an AVI file format to watch outside of 3d studio max.

Here is the animation I created following the above:

Friday 6 February 2009

Semester 2 3D Modelling & Animation 2009

Semester 2 Tutorial 1

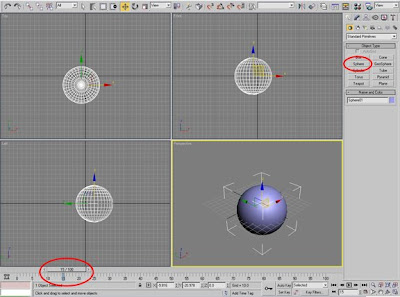
To be completely honest i wasnt in the tutorial due to illness but i followed up on the Blog to see what had been going on and experimented with 3d Studio max on my own to explore the animation basics, I created a Sphere shape to start with from the 3d panel on the right of the interface and moved the timeline along to the 15 th keyframe (see pic below)


So once I had placed the slider on keyframe 15 I clicked on the 'Auto Key' Button in order to set the keyframe for this basic animation sequence. I then moved the sphere to a different location, any location will do and it will automatically create a new keyframe location which bookmarks the next point that it will move to when in motion.


I then continued this set of events to create a longer animation and the attempted to export the animation as a movie file even though we were not taught to do this I thought it would be beneficial to people reading this If i managed to get it right. So with any luck, we should be able to watch a video of my first attempt at animation in 3D studio max


I managed to create this video by clciking the 'Animation' tab on the Menu bar, then clicking 'Make Preview'. Then I just waited for the video to render and then chose to 'rename preview' when it had finished so then i could save it into my directory at university.